How to add a printer in Bartender? This guide walks you through the process of connecting your printer to Bartender software, a powerful tool for creating and printing labels, barcodes, and more. Whether you’re a seasoned user or just starting out, this guide will provide the steps and insights you need to get your printer up and running with Bartender.
Bartender software is designed to streamline the creation and printing of labels, making it a valuable asset for businesses of all sizes. Understanding how to integrate your printer with Bartender is essential for maximizing its potential. This guide will cover the basics of printer setup, configuration, and troubleshooting tips to ensure a smooth integration process.
Understanding Bartender and Printer Integration

Bartender is a powerful software application designed for label and document design, which plays a crucial role in streamlining printing processes across various industries. It provides a comprehensive platform for creating, managing, and printing labels, tags, and other documents, enabling businesses to automate and optimize their printing workflows.
Types of Printers Commonly Used with Bartender
Bartender is compatible with a wide range of printers, catering to diverse printing needs. The choice of printer depends on the specific application and requirements. Here are some common printer types used with Bartender:
- Thermal Transfer Printers:These printers use heat to transfer ink from a ribbon onto a label, producing high-quality, durable prints. They are commonly used in industries like logistics, manufacturing, and healthcare.
- Direct Thermal Printers:These printers use heat to activate a special heat-sensitive paper, creating prints without the need for a ribbon. They are often used for temporary labels, receipts, and tickets.
- Laser Printers:Laser printers utilize a laser beam to create an image on a drum, which then transfers toner onto paper. They are suitable for high-volume printing and are commonly used for labels and documents with intricate designs.
- Inkjet Printers:Inkjet printers use tiny nozzles to spray ink onto paper, producing high-quality color prints. They are commonly used for labels and documents that require a wide range of colors.
Benefits of Integrating a Printer with Bartender
Integrating a printer with Bartender offers numerous benefits, including:
- Increased Efficiency:Bartender automates the printing process, eliminating manual tasks and reducing errors. It allows for batch printing, label sequencing, and other features that enhance efficiency.
- Improved Accuracy:Bartender provides tools for creating accurate labels and documents, reducing the risk of errors. It also supports barcode generation and data validation, ensuring data integrity.
- Enhanced Security:Bartender offers features like password protection and access control, safeguarding sensitive information and preventing unauthorized access.
- Cost Savings:By automating printing processes and reducing errors, Bartender helps businesses save time, materials, and labor costs.
- Scalability:Bartender is designed to handle high-volume printing, making it suitable for businesses of all sizes.
Connecting Your Printer to Bartender

Now that you understand the basics of Bartender and how it integrates with printers, let’s get your printer connected. This step is crucial for designing and printing labels effectively.There are a few different ways to connect your printer to Bartender, each with its own advantages and considerations.
Let’s explore them in detail.
Connecting Methods
Connecting your printer to Bartender is a simple process that involves choosing the appropriate connection method based on your printer’s capabilities and your network setup. Here are the most common connection methods:
- USB Connection: This is the most straightforward method, especially for printers that are not network-enabled. Simply connect the printer’s USB cable to your computer, and Bartender will automatically detect it.
- Network Connection: If your printer is network-enabled, you can connect it to your network using an Ethernet cable or Wi-Fi. Bartender can then access the printer through the network. This method offers flexibility as multiple computers can share the printer.
- Serial Connection: Some older printers use serial connections. While less common today, this method involves connecting the printer to your computer using a serial cable. You’ll need to configure the serial port settings in Bartender to establish communication.
Troubleshooting Connection Issues
While connecting your printer is usually a smooth process, you might encounter some issues. Here are some common troubleshooting tips:
- Ensure the printer is turned on and connected: This may seem obvious, but it’s often the simplest solution. Double-check that your printer is powered on and the connection cable is securely plugged in.
- Check the printer driver: Make sure you have the correct driver installed for your printer. If the driver is outdated or missing, it can cause connection problems. You can usually download the latest driver from the printer manufacturer’s website.
- Verify network connectivity: If you’re using a network connection, ensure your printer is connected to the same network as your computer. You can also check for network connectivity issues by testing other devices on the network.
- Restart Bartender and your computer: Sometimes, a simple restart can resolve connection problems. Restart both Bartender and your computer to see if it fixes the issue.
- Check the printer’s status: Look for error messages or status indicators on the printer itself. These messages can provide valuable clues about the problem.
Remember, if you’re still facing connection issues, refer to your printer’s user manual or contact the manufacturer’s technical support for further assistance.
Configuring Printer Settings in Bartender

Bartender offers a wide range of settings that allow you to fine-tune your printing experience. You can adjust everything from the paper size and orientation to the print quality and color settings. This level of control ensures your labels and documents are printed exactly as you intended.
Paper Size and Orientation
The paper size and orientation settings determine the physical dimensions and layout of your printed labels or documents.
- Paper Size: This setting specifies the width and height of the paper you are using. Bartender supports a wide range of standard paper sizes, including Letter, A4, and custom sizes. Select the paper size that matches the media loaded in your printer.
- Orientation: This setting determines whether your label or document will be printed in portrait or landscape mode. Portrait mode prints the label or document vertically, while landscape mode prints it horizontally.
Print Quality
The print quality setting controls the resolution and detail of your printed labels or documents.
- Resolution: Measured in dots per inch (DPI), resolution determines the number of ink dots printed per unit of area. Higher DPI values result in sharper and more detailed prints, but may increase printing time. Lower DPI values result in faster printing but may sacrifice detail.
- Color Depth: This setting determines the number of colors that can be printed. For example, a 24-bit color depth allows for millions of colors, while a 1-bit color depth limits printing to black and white.
Other Printer Settings
Beyond paper size, orientation, and print quality, Bartender offers a range of other settings that can be adjusted to optimize your printing experience.
| Setting | Impact on Printing |
|---|---|
| Print Mode | Determines the printing method used. Common modes include draft, standard, and high quality. |
| Color Mode | Specifies the color profile used for printing. This setting can be adjusted to achieve accurate color reproduction on different media types. |
| Print Speed | Controls the speed at which labels or documents are printed. Lower speeds may result in higher print quality, while higher speeds may sacrifice detail. |
| Print Margins | Adjusts the amount of space between the printed content and the edges of the label or document. |
| Print Density | Controls the darkness of the printed ink. |
Creating and Printing Labels with Bartender

Now that you have your printer set up and ready to go, it’s time to dive into the fun part: creating and printing labels! Bartender provides a user-friendly interface to design labels of all shapes and sizes.
Designing Labels, How to add a printer in bartender
The label design process in Bartender is intuitive and flexible. Here’s how you can get started:
- Choose a Template:Bartender offers a wide variety of pre-designed templates to get you started. You can find templates for various industries and label types, such as shipping labels, product labels, and barcode labels.
- Create a New Label:If you need a custom design, you can create a new label from scratch. Bartender provides tools for drawing shapes, adding text, inserting barcodes, and incorporating images.
- Customize Your Design:Once you have a template or a new label, you can customize it to your liking. You can change the size, shape, color, and font of your labels. You can also add text boxes, images, and barcodes to your design.
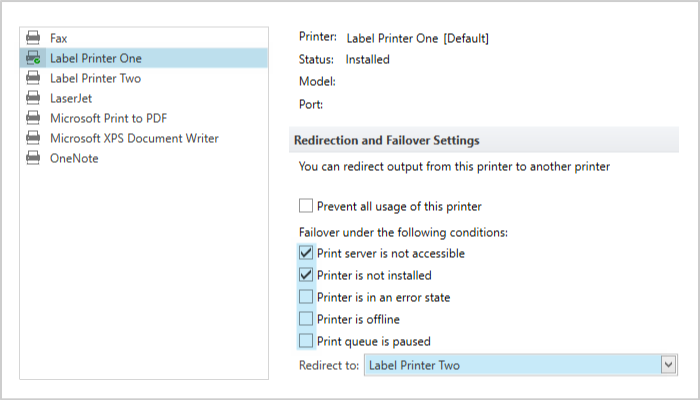
Adding a printer in Bartender is a breeze! Just go to the “File” menu, select “Print Setup,” and choose your printer. You can also customize the print settings to your liking. Speaking of prints, did you know that art prints are copies of painted artwork ?
Once you’ve got your printer set up, you can print out all your favorite artwork and enjoy it in your home or office.
Integrating Data Sources
The real power of Bartender comes from its ability to integrate data from various sources. This means you can create dynamic labels that automatically pull information from databases, spreadsheets, or other data sources. This eliminates the need for manual data entry and ensures accuracy.
- Database Integration:You can connect your Bartender labels to databases like Microsoft SQL Server, Oracle, or MySQL. This allows you to pull data directly from your database and populate your labels with relevant information.
- Spreadsheet Integration:If you use spreadsheets like Microsoft Excel, you can also integrate them into your Bartender labels. This allows you to use spreadsheet data to create labels with variable information.
- Text File Integration:Bartender supports importing data from text files, which can be helpful for situations where you have simple data in a plain text format.
Label Formats and Uses
Bartender supports a wide range of label formats, allowing you to create labels for various purposes. Here are some examples:
- Shipping Labels:These labels are used for shipping packages and typically include information like the recipient’s address, tracking number, and shipping method.
- Product Labels:These labels are used to identify products and provide information like product name, description, ingredients, and barcode.
- Barcode Labels:These labels are used for tracking inventory, identifying products, and managing logistics. They typically include a barcode that can be scanned for easy identification.
- Asset Labels:These labels are used to identify and track assets, such as equipment, computers, and other valuable items.
- Patient Labels:These labels are used in healthcare settings to identify patients and provide information like patient name, medical record number, and allergies.
Advanced Printing Techniques: How To Add A Printer In Bartender

Bartender offers a range of advanced features that enable you to create highly customized and efficient labels. These features empower you to incorporate dynamic data, automate label generation, and optimize your printing process.
Using Barcodes, QR Codes, and Serial Numbers
Barcodes, QR codes, and serial numbers are essential elements in label design, enabling efficient data capture, tracking, and identification. Bartender provides tools to easily integrate these elements into your labels.
- Barcodes:Barcodes are used for encoding information that can be quickly scanned and interpreted. Bartender supports various barcode types, including Code 39, Code 128, and UPC-A. To add a barcode, simply select the barcode object from the toolbar and configure its properties, such as the data source and symbology.
- QR Codes:QR codes are two-dimensional barcodes that can store a larger amount of information compared to traditional barcodes. Bartender allows you to create QR codes that link to websites, store contact information, or encode text. To add a QR code, follow a similar process as adding a barcode, selecting the QR code object and configuring its properties.
- Serial Numbers:Serial numbers are unique identifiers that can be used to track individual items. Bartender enables you to generate sequential serial numbers automatically. You can configure the starting number, increment value, and format of the serial number.
Creating Labels with Variable Data
Variable data allows you to create labels with unique information for each print run. This is particularly useful for applications where labels need to contain different data, such as product names, serial numbers, or batch numbers.
- Data Sources:Bartender supports various data sources, including databases, spreadsheets, and text files. You can connect to a data source and map fields from the data source to specific objects on your label. For example, you can map the “Product Name” field from a database to a text object on your label.
- Data Transformations:Bartender allows you to manipulate data before it is printed. You can use functions to format data, such as converting dates or adding prefixes. This enables you to create labels with customized data formats.
- Data Merging:Bartender enables you to merge data from multiple sources. This allows you to create labels that combine information from different databases or spreadsheets. For example, you can merge data from a product database and a customer database to create labels with product information and customer details.
Using Conditional Printing to Customize Labels
Conditional printing allows you to create labels that adapt to specific conditions based on the data being printed. This enables you to create labels with different appearances or content based on criteria, such as product type, batch number, or customer location.
- Conditional Formatting:Bartender allows you to apply conditional formatting to objects on your label. This means that the appearance of an object, such as its color, font, or visibility, can be changed based on specific conditions. For example, you can change the color of a text object to red if the product is out of stock.
- Conditional Content:You can also use conditional logic to control the content of your label. This allows you to display different information based on specific conditions. For example, you can display a “Caution” label if the product requires special handling.
FAQs
What types of printers are compatible with Bartender?
Bartender supports a wide range of printers, including thermal, laser, and inkjet models. The specific compatibility will depend on the version of Bartender you are using. Refer to the Bartender documentation for a complete list of supported printers.
Can I use a network printer with Bartender?
Yes, Bartender can connect to network printers. During the printer setup process, select the “Network” option and provide the necessary information about your printer’s network address and other settings.
How do I troubleshoot printer connection problems?
Start by verifying the printer is powered on and connected to your network (if applicable). Check your printer’s driver settings and make sure they are configured correctly. If you’re using a USB connection, try a different port. If you’re still experiencing issues, consult the Bartender documentation or contact their support team.
