Within the Windows Operating System, there are many features and applications to help doing things easier such as the printer manager Windows 7. It will help users to manage all of the installed and connected printers to the computer or laptop that the users are currently using. Managing such things is crucial to do the printing properly using the right hardware. There are some drivers or software paired to any printer that functions just the same as this one from Windows.

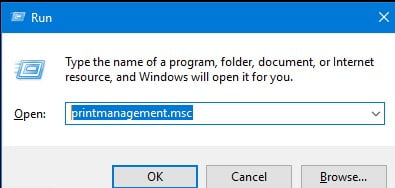
In general, the purpose of the so-called Print Management in Windows 7 is the same as the printer manager Windows 10. It is one of the Microsoft Management Console snap-ins that provides a set of things to do to install, view, and then manage printers. It is very easy to use. It is easily accessible through the Run Command by typing printmanagement.msc after opening the Run Command by pressing Windows key + R at the same time.

On the other hand, it is also accessible through the Control Panel under the Administrative Tools menu. Within that particular menu, there are several options to choose one of which is Print Management. Unfortunately in any Home version of the Windows Operating System, the menu is not there. So, the closest alternative to doing such a thing as managing printers is to go to the Devices and Printers under the Control Panel menus. That will offer a bit similar set of things to Print Management.
Printer manager Windows 7 is much needed to check all of the connected printers to either a computer or a laptop. Once the Printer Management console is opened there should be the Print Servers menu on the left to expand. Once it opens the next part, users can delete the already connected printers and add new ones as well. It is also the place to check any problem with the connected printers and initialize the print test as well.
It is not a kind of advanced application but it is very much needed. It does not need any of that additional printer companion software to install when connecting a new set of the printer. The one thing that has to be installed to accompany a new printer is just the printer driver. With the printer driver installed along with the printer manager Windows 7, it is enough for it to function the printer for a lot of purposes at the best possible level of the hardware.
How to open the printer manager windows 7?
If you want to open the printer manager windows 7, then you can do it in two ways. I am explaining both of them here:
Option 1: Open it from the Control Panel
- Open the Control Panel on your computer. You can do this by pressing the Windows key + R and typing ‘control’ in the Run box. Press Enter to open it.
- Now click on Devices and Printers option.
- On the left side, you will see an option that says ‘Add a printer’. Click on it. This will open up a new window where you can add a new printer.
- If you have connected your printer using a USB cable, then you need to select Add a local printer option. If it is connected using WiFi, then select Add a network or wireless printer option and follow the instructions displayed on screen.
Option 2: Open it from the Devices and Printers folder
- Press the Windows key + R to open up Run box. Type ‘control printers’ in that box and press Enter to open up the Devices and Printers folder where all your printers would be listed. You will also see other devices that are connected with your computer over Bluetooth or WiFi.
How to see the connected printers?
The attached printer is not displayed in the printer list of the device list? In this case, you can manage and connect the connected printers in Windows 7.
In this tip we show you how to find the managed printers, how to install them and how to set a default printer.
To do this, open the “Devices and Printers” folder in Windows 7.
You can do this, for example, by searching for “devices and printers” from the start menu or by typing “control printers” in the Run box (Windows logo + R).
How to make a default printer?
You can use Windows 7’s “Printer Manager” to manage the printers connected to your computer. The Printer Manager allows you to make a default printer and delete any unused or unwanted printers.
Steps:
- Click the “Start” button at the bottom left of your screen.
- Click “Devices and Printers”.
- Right-click on the printer you want to set as your default printer and select “Set as default printer”.Section: How to print a test page?
The Printer Manager is one of the most important features of the Mac OS that deals with printing. The Printer Manager can be accessed by choosing the Print Center option from the Apple menu. The Mac OS X 10.2 and later versions have renamed the Print Center as Printer Setup Utility.
The Printer Manager is used to manage printers, monitor print jobs and printer queues, perform printer maintenance, add or remove printers and change settings for specific printers. The Printer Manager also allows you to add new printers if they are not connected to your computer or you can use it to reconnect a previously connected printer.
The Printer Manager allows you to create a default printer, which will be used whenever print jobs are executed without specifying the printer name. Default printer can also be specified in the application itself. You can change the default setting for a particular application in your computer, so that whenever you execute a print job through this application, it will be sent to a specific printer.
How to delete a printer?
If you want to delete a printer that is no longer required, then follow the steps given below.
- Step 1 − To open the printer manager window, go to Start → Control Panel → System and Security → Devices and Printers. This will open up the Printers window.
- Step 2 − Right-click on the printer you want to delete. A drop-down menu will appear.
- Step 3 − Click on Delete from the drop-down menu. Confirm your choice by clicking Yes from the pop-up menu. The selected printer will be removed from the list of printers.
To delete a printer:
- Step 1: Click Start and then click Devices and Printers.
- Step 2: Right-click the printer you want to delete, and then click Delete.
- Step 3: If you are prompted for an administrator password or confirmation, type the password or provide confirmation.
You can easily manage connected printers using Printer Manager Windows 7.
Windows 7 provides a number of new features and improvement in the area of printing and printer management. Printer Management is one of these areas where you can benefit from the new and improved features. The Windows 7 Printer Management offers a very easy and simple way to manage the printers connected to your computer using Printer Manager Windows 7.
In this guide, we will see how you can use Printer Manager Windows 7 to manage connected printers.
